Top 10 Mistakes Node.js Developers Make
Introduction
Node.js has seen an important growth in the past years, with big companies such as Walmart or PayPal adopting it. More and more people are picking up Node and publishing modules to NPM at such a pace that exceeds other languages. However, the Node philosophy can take a bit to get used to, especially if you have switched from another language.
In this article we will talk about the most common mistakes Node developers make and how to avoid them. You can find the source code for the examples on github.
1 Not using development tools
- nodemon or supervisor for automatic restart
- In-browser live reload (reload after static files and/or views change)
Unlike other languages such as PHP or Ruby, Node requires a restart when you make changes to the source code. Another thing that can slow you down while creating web applications is refreshing the browser when the static code changes. While you can do these things manually, there are better solutions out there.
1.1 Automating restarts
Most of us are probably used to saving a file in the editor, hit [CTRL+C] to stop the application and then restart it by pressing the [UP] arrow and [Enter]. However you can automate this repetitive task and make your development process easier by using existing tools such as:
What these modules do is to watch for file changes and restart the server for you. Let us take nodemon for example. First you install it globally:
npm i nodemon -g
Then you should simply swap the node command for the nodemon command:
  # node server.js

  $ nodemon server.js
  14 Nov 21:23:23 - [nodemon] v1.2.1
  14 Nov 21:23:23 - [nodemon] to restart at any time, enter `rs`
  14 Nov 21:23:23 - [nodemon] watching: *.*
  14 Nov 21:23:23 - [nodemon] starting `node server.js`
  14 Nov 21:24:14 - [nodemon] restarting due to changes...
  14 Nov 21:24:14 - [nodemon] starting `node server.js`
Among the existing options for nodemon or node-supervisor, probably the most popular one is to ignore specific files or folders.
1.2 Automatic browser refresh
Besides reloading the Node application when the source code changes, you can also speed up development for web applications. Instead of manually triggering the page refresh in the browser, we can automate this as well using tools such as livereload.
They work similarly to the ones presented before, because they watch for file changes in certain folders and trigger a browser refresh in this case (instead of a server restart). The refresh is done either by a script injected in the page or by a browser plugin.
Instead of showing you how to use livereload, this time we will create a similar tool ourselves with Node. It will do the following:
- Watch for file changes in a folder;
- Send a message to all connected clients using server-sent events; and
- Trigger the page reload.
First we should install the NPM dependencies needed for the project:
- express - for creating the sample web application
- watch - to watch for file changes
- sendevent - server-sent events, SSE (an alternative would have been websockets)
- uglify-js - for minifying the client-side JavaScript files
- ejs - view templates
Next we will create a simple Express server that renders a home view on the front page:
var express = require('express');
var app = express();
var ejs = require('ejs');
var path = require('path');

var PORT = process.env.PORT || 1337;

// view engine setup
app.engine('html', ejs.renderFile);
app.set('views', path.join(__dirname, 'views'));
app.set('view engine', 'html');

// serve an empty page that just loads the browserify bundle
app.get('/', function(req, res) {
res.render('home');
});

app.listen(PORT);
console.log('server started on port %s', PORT);
Since we are using Express we will also create the browser-refresh tool as an Express middleware. The middleware will attach the SSE endpoint and will also create a view helper for the client script.
The arguments for the middleware function will be the Express app and the folder to be monitored.
Since we know that, we can already add the following lines before the view setup (inside server.js):
var reloadify = require('./lib/reloadify');
reloadify(app, __dirname + '/views');
We are watching the /views folder for changes. And now for the middleware:
  var sendevent = require('sendevent');
  var watch = require('watch');
  var uglify = require('uglify-js');
  var fs = require('fs');
  var ENV = process.env.NODE_ENV || 'development';

  // create && minify static JS code to be included in the page
  var polyfill = fs.readFileSync(__dirname + '/assets/eventsource-polyfill.js', 'utf8');
  var clientScript = fs.readFileSync(__dirname + '/assets/client-script.js', 'utf8');
  var script = uglify.minify(polyfill + clientScript, { fromString: true }).code;

  function reloadify(app, dir) {
    if (ENV !== 'development') {
      app.locals.watchScript = '';
      return;
    }

    // create a middlware that handles requests to `/eventstream`
    var events = sendevent('/eventstream');

    app.use(events);

    watch.watchTree(dir, function (f, curr, prev) {
      events.broadcast({ msg: 'reload' });
    });

    // assign the script to a local var so it's accessible in the view
    app.locals.watchScript = '<script>' + script + '</script>';
  }

  module.exports = reloadify;
As you might have noticed, if the environment isn't set to 'development' the middleware won't do anything. This means we won't have to remove it for production.
The frontend JS file is pretty simple, it will just listen to the SSE messages and reload the page when needed:
  (function() {

    function subscribe(url, callback) {
      var source = new window.EventSource(url);

      source.onmessage = function(e) {
        callback(e.data);
      };

      source.onerror = function(e) {
        if (source.readyState == window.EventSource.CLOSED) return;

        console.log('sse error', e);
      };

      return source.close.bind(source);
    };

    subscribe('/eventstream', function(data) {
      if (data && /reload/.test(data)) {
        window.location.reload();
      }
    });

  }());
The eventsource-polyfill.js is Remy Sharp's polyfill for SSE. Last but not least, the only thing left to do is to include the frontend generated script into the page (/views/home.html) using the view helper:
  ...
  <%- watchScript %>
  ...
Now every time you make a change to the home.html page the browser will automatically reload the home page of the server for you (http://localhost:1337/).
2 Blocking the event loop
Since Node.js runs on a single thread, everything that will block the event loop will block everything. That means that if you have a web server with a thousand connected clients and you happen to block the event loop, every client will just...wait.
Here are some examples on how you might do that (maybe unknowingly):
The thing is that you may do these things unknowingly, because parsing a 15 Mb output doesn't come up that often, right? It's enough for an attacker to catch you off-guard and your entire server will be DDOS-ed.
Luckily you can monitor the event loop delay to detect anomalies. This can be achieve either via proprietary solutions such as StrongOps or by using open-source modules such as blocked.
The idea behind these tools is to accurately track the time spend between an interval repeatedly and report it. The time difference is calculated by getting the time at moment A and moment B, subtracting the time at moment A from moment B and also subtracting the time interval.
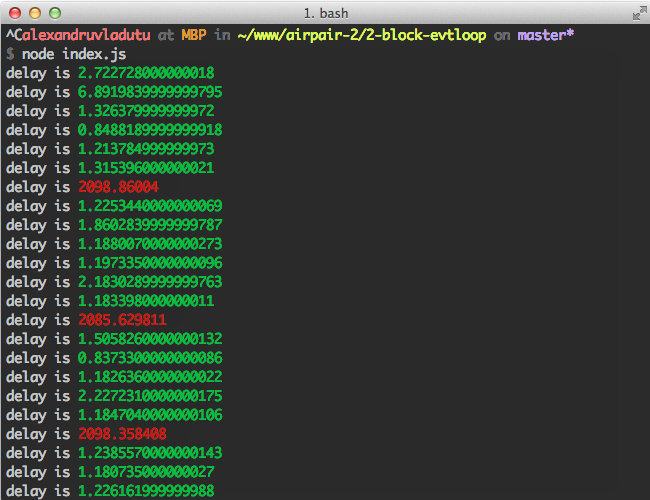
Below there's an example on how to achieve that. It does the following:
- Retrieve the high-resolution time between the current time and the time passed as a param;
- Determines the delay of the event loop at regular intervals;
- Displays the delay in green or red, in case it exceeds the threshold; then
- To see it in action, each 300 miliseconds a heavy computation is executed.
The source code for the example is the following:
  var getHrDiffTime = function(time) {
    // ts = [seconds, nanoseconds]
    var ts = process.hrtime(time);
    // convert seconds to miliseconds and nanoseconds to miliseconds as well
    return (ts[0] * 1000) + (ts[1] / 1000000);
  };

  var outputDelay = function(interval, maxDelay) {
    maxDelay = maxDelay || 100;

    var before = process.hrtime();

    setTimeout(function() {
      var delay = getHrDiffTime(before) - interval;

      if (delay < maxDelay) {
        console.log('delay is %s', chalk.green(delay));
      } else {
        console.log('delay is %s', chalk.red(delay));
      }

      outputDelay(interval, maxDelay);
    }, interval);
  };

  outputDelay(300);

  // heavy stuff happening every 2 seconds here
  setInterval(function compute() {
    var sum = 0;

    for (var i = 0; i <= 999999999; i++) {
      sum += i * 2 - (i + 1);
    }
  }, 2000);
You must install the chalk before running it. After running the example you should see the following output in the terminal:
As said before, existing open source modules are doing it similarly so use them with confidence:
If you couple this technique with profiling, you can determine exactly which part of your code caused the delay.
3 Executing a callback multiple times
How many times have you saved a file and reloaded your Node web app only to see it crash really fast? The most likely scenario is that you executed the callback twice, meaning you forgot to return after the first time.
Let's create an example to replicate this situation. We will create a simple proxy server with some basic validation. To use it install the request dependency, run the example and open (for instance) http://localhost:1337/?url=http://www.google.com/.
The source code for our example is the following:
  var request = require('request');
  var http = require('http');
  var url = require('url');
  var PORT = process.env.PORT || 1337;

  var expression = /[-a-zA-Z0-9@:%_\+.~#?&//=]{2,256}\.[a-z]{2,4}\b(\/[-a-zA-Z0-9@:%_\+.~#?&//=]*)?/gi;
  var isUrl = new RegExp(expression);

  var respond = function(err, params) {
    var res = params.res;
    var body = params.body;
    var proxyUrl = params.proxyUrl;

    res.setHeader('Content-type', 'text/html; charset=utf-8');

    if (err) {
      console.error(err);
      res.end('An error occured. Please make sure the domain exists.');
    } else {
      res.end(body);
    }
  };

  http.createServer(function(req, res) {
    var queryParams = url.parse(req.url, true).query;
    var proxyUrl = queryParams.url;

    if (!proxyUrl || (!isUrl.test(proxyUrl))) {
      res.writeHead(200, { 'Content-Type': 'text/html' });
      res.write("Please provide a correct URL param. For ex: ");
      res.end("<a href='http://localhost:1337/?url=http://www.google.com/'>http://localhost:1337/?url=http://www.google.com/</a>");
    } else {
      // ------------------------
      // Proxying happens here
      // TO BE CONTINUED
      // ------------------------
    }
  }).listen(PORT);
The source code above contains almost everything except the proxying itself, because I want you to take a closer look at it:
request(proxyUrl, function(err, r, body) {
if (err) {
    respond(err, {
    res: res,
    proxyUrl: proxyUrl
    });
}

respond(null, {
    res: res,
    body: body,
    proxyUrl: proxyUrl
});
});
In the callback we have handled the error condition, but forgot to stop the execution flow after calling the respond function. That means that if we enter a domain that doesn't host a website, the respond function will be called twice and we will get the following message in the terminal:
  Error: Can't set headers after they are sent.
      at ServerResponse.OutgoingMessage.setHeader (http.js:691:11)
      at respond (/Users/alexandruvladutu/www/airpair-2/3-multi-callback/proxy-server.js:18:7)

This can be avoided either by using the `return` statement or by wrapping the 'success' callback in the `else` statement:
  request(.., function(..params) {
    if (err) {
      return respond(err, ..);
    }

    respond(..);
  });

  // OR:

  request(.., function(..params) {
    if (err) {
      respond(err, ..);
    } else {
      respond(..);
    }
  });
4 The Christmas tree of callbacks (Callback Hell)
Every time somebody wants to bash Node they come up with the 'callback hell' argument. Some of them see callback nesting as unavoidable, but that is simply untrue. There are a number of solutions out there to keep your code nice and tidy, such as:
We are going to create a sample application and then refactor it to use the async module. The app will act as a naive frontend resource analyzer which does the following:
- Checks how many scripts / stylesheets / images are in the HTML code;
- Outputs the their total number to the terminal;
- Checks the content-length of each resource; then
- Puts the total length of the resources to the terminal.
Besides the async module, we will be using the following npm modules:
- request for getting the page data (body, headers, etc).
- cheerio as jQuery on the backend (DOM element selector).
- once to make sure our callback is executed once.
  var URL = process.env.URL;
  var assert = require('assert');
  var url = require('url');
  var request = require('request');
  var cheerio = require('cheerio');
  var once = require('once');
  var isUrl = new RegExp(/[-a-zA-Z0-9@:%_\+.~#?&//=]{2,256}\.[a-z]{2,4}\b(\/[-a-zA-Z0-9@:%_\+.~#?&//=]*)?/gi);

  assert(isUrl.test(URL), 'must provide a correct URL env variable');

  request({ url: URL, gzip: true }, function(err, res, body) {
    if (err) { throw err; }

    if (res.statusCode !== 200) {
      return console.error('Bad server response', res.statusCode);
    }

    var $ = cheerio.load(body);
    var resources = [];

    $('script').each(function(index, el) {
      var src = $(this).attr('src');
      if (src) { resources.push(src); }
    });

    // .....
    // similar code for stylesheets and images
    // checkout the github repo for the full version

    var counter = resources.length;
    var next = once(function(err, result) {
      if (err) { throw err; }

      var size = (result.size / 1024 / 1024).toFixed(2);

      console.log('There are ~ %s resources with a size of %s Mb.', result.length, size);
    });

    var totalSize = 0;

    resources.forEach(function(relative) {
      var resourceUrl = url.resolve(URL, relative);

      request({ url: resourceUrl, gzip: true }, function(err, res, body) {
        if (err) { return next(err); }

        if (res.statusCode !== 200) {
          return next(new Error(resourceUrl + ' responded with a bad code ' + res.statusCode));
        }

        if (res.headers['content-length']) {
          totalSize += parseInt(res.headers['content-length'], 10);
        } else {
          totalSize += Buffer.byteLength(body, 'utf8');
        }

        if (!--counter) {
          next(null, {
            length: resources.length,
            size: totalSize
          });
        }
      });
    });
  });
This doesn't look that horrible, but you can go even deeper with nested callbacks. From our previous example you can recognize the Christmas tree at the bottom, where you see indentation like this:
        if (!--counter) {
          next(null, {
            length: resources.length,
            size: totalSize
          });
        }
      });
    });
  });
To run the app type the following into the command line:
  $ URL=https://bbc.co.uk/ node before.js
  # Sample output:
  # There are ~ 24 resources with a size of 0.09 Mb.
After a bit of refactoring using async our code might look like the following:
  var async = require('async');

  var rootHtml = '';
  var resources = [];
  var totalSize = 0;

  var handleBadResponse = function(err, url, statusCode, cb) {
    if (!err && (statusCode !== 200)) {
      err = new Error(URL + ' responded with a bad code ' + res.statusCode);
    }

    if (err) {
      cb(err);
      return true;
    }

    return false;
  };

  async.series([
    function getRootHtml(cb) {
      request({ url: URL, gzip: true }, function(err, res, body) {
        if (handleBadResponse(err, URL, res.statusCode, cb)) { return; }

        rootHtml = body;

        cb();
      });
    },
    function aggregateResources(cb) {
      var $ = cheerio.load(rootHtml);

      $('script').each(function(index, el) {
        var src = $(this).attr('src');
        if (src) { resources.push(src); }
      });

      // similar code for stylesheets && images; check the full source for more

      setImmediate(cb);
    },
    function calculateSize(cb) {
      async.each(resources, function(relativeUrl, next) {
        var resourceUrl = url.resolve(URL, relativeUrl);

        request({ url: resourceUrl, gzip: true }, function(err, res, body) {
          if (handleBadResponse(err, resourceUrl, res.statusCode, cb)) { return; }

          if (res.headers['content-length']) {
            totalSize += parseInt(res.headers['content-length'], 10);
          } else {
            totalSize += Buffer.byteLength(body, 'utf8');
          }

          next();
        });
      }, cb);
    }
  ], function(err) {
    if (err) { throw err; }

    var size = (totalSize / 1024 / 1024).toFixed(2);
    console.log('There are ~ %s resources with a size of %s Mb.', resources.length, size);
  });
5 Creating big monolithic applications
Developers new to Node come with mindsets from different languages and they tend to do things differently. For example including everything into a single file, not breaking things into their own modules and publishing to NPM, etc.
Take our previous example for instance. We have pushed everything into a single file, making it hard to test and read the code. But no worries, with a bit of refactoring we can make it much nicer and more modular. This will also help with 'callback hell' in case you were wondering.
If we extract the URL validator, the response handler, the request functionality and the resource processor into their own files our main one will look like so:
  // ...
  var handleBadResponse = require('./lib/bad-response-handler');
  var isValidUrl = require('./lib/url-validator');
  var extractResources = require('./lib/resource-extractor');
  var request = require('./lib/requester');

  // ...
  async.series([
    function getRootHtml(cb) {
      request(URL, function(err, data) {
        if (err) { return cb(err); }

        rootHtml = data.body;

        cb(null, 123);
      });
    },
    function aggregateResources(cb) {
      resources = extractResources(rootHtml);

      setImmediate(cb);
    },
    function calculateSize(cb) {
      async.each(resources, function(relativeUrl, next) {
        var resourceUrl = url.resolve(URL, relativeUrl);

        request(resourceUrl, function(err, data) {
          if (err) { return next(err); }

          if (data.res.headers['content-length']) {
            totalSize += parseInt(data.res.headers['content-length'], 10);
          } else {
            totalSize += Buffer.byteLength(data.body, 'utf8');
          }

          next();
        });
      }, cb);
    }
  ], function(err) {
    if (err) { throw err; }

    var size = (totalSize / 1024 / 1024).toFixed(2);
    console.log('\nThere are ~ %s resources with a size of %s Mb.', resources.length, size);
  });
The request functionality might look like this:
  var handleBadResponse = require('./bad-response-handler');
  var request = require('request');

  module.exports = function getSiteData(url, callback) {
    request({
      url: url,
      gzip: true,
      // lying a bit
      headers: {
        'User-Agent': 'Mozilla/5.0 (Windows NT 6.1; WOW64) AppleWebKit/537.36 (KHTML, like Gecko) Chrome/38.0.2125.111 Safari/537.36'
      }
    }, function(err, res, body) {
      if (handleBadResponse(err, url, res && res.statusCode, callback)) { return; }

      callback(null, {
        body: body,
        res: res
      });
    });
  };
Note: you can check the full example in the github repo.
Now things are simpler, way easier to read and we can start writing tests for our app. We can go on with the refactoring and extract the response length functionality into its own module as well.
The good thing about Node is that it encourages you to write tiny modules and publish them to NPM. You will find modules for all kinds of things such as generating a random number between an interval. You should strive for modularity in your Node applications and keeping things as simple as possible.
An interesting article on how to write modules is the one from substack.
6 Poor logging
Many Node tutorials show you a small example that contains console.log here and there, so some developers are left with the impression that that's how they should implement logging in their application.
You should use something better than console.log when coding Node apps, and here's why:
- No need to use
util.inspectfor large, complex objects; - Built-in serializers for things like errors, request and response objects;
- Support multiple sources for controlling where the logs go;
- Automatic inclusion of hostname, process id, application name;
- Supports multiple levels of logging (debug, info, error, fatal etc);
- Advanced functionality such as log file rotation, etc.
You can get all of those for free when using a production-ready logging module such as bunyan. On top of that you also get a handy CLI tool for development if you install the module globally.
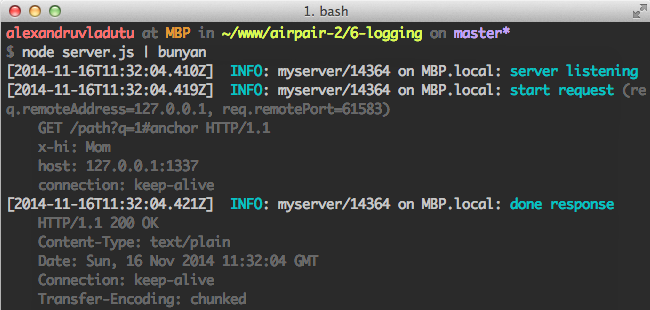
Let's take a look at one of their examples on how to use it:
  var http = require('http');
  var bunyan = require('bunyan');

  var log = bunyan.createLogger({
    name: 'myserver',
    serializers: {
      req: bunyan.stdSerializers.req,
      res: bunyan.stdSerializers.res
    }
  });

  var server = http.createServer(function (req, res) {
    log.info({ req: req }, 'start request');  // <-- this is the guy we're testing
    res.writeHead(200, { 'Content-Type': 'text/plain' });
    res.end('Hello World\n');
    log.info({ res: res }, 'done response');  // <-- this is the guy we're testing
  });

  server.listen(1337, '127.0.0.1', function() {
    log.info('server listening');

    var options = {
      port: 1337,
      hostname: '127.0.0.1',
      path: '/path?q=1#anchor',
      headers: {
        'X-Hi': 'Mom'
      }
    };

    var req = http.request(options, function(res) {
      res.resume();
      res.on('end', function() {
        process.exit();
      })
    });

    req.write('hi from the client');
    req.end();
  });
If you run the example in the terminal you will see something like the following:
  $ node server.js
  {"name":"myserver","hostname":"MBP.local","pid":14304,"level":30,"msg":"server listening","time":"2014-11-16T11:30:13.263Z","v":0}
  {"name":"myserver","hostname":"MBP.local","pid":14304,"level":30,"req":{"method":"GET","url":"/path?q=1#anchor","headers":{"x-hi":"Mom","host":"127.0.0.1:1337","connection":"keep-alive"},"remoteAddress":"127.0.0.1","remotePort":61580},"msg":"start request","time":"2014-11-16T11:30:13.271Z","v":0}
  {"name":"myserver","hostname":"MBP.local","pid":14304,"level":30,"res":{"statusCode":200,"header":"HTTP/1.1 200 OK\r\nContent-Type: text/plain\r\nDate: Sun, 16 Nov 2014 11:30:13 GMT\r\nConnection: keep-alive\r\nTransfer-Encoding: chunked\r\n\r\n"},"msg":"done response","time":"2014-11-16T11:30:13.273Z","v":0}
But in development it's better to use the CLI tool like in the screenshot:
As you can see, bunyan gives you a lot of useful information about the current process, which is vital into production. Another handy feature is that you can pipe the logs into a stream (or multiple streams).
7 No tests
We should never consider our applications 'done' if we didn't write any tests for them. There's really no excuse for that, considering how many existing tools we have for that:
The convention for NPM modules is that you specify a test command in your package.json, for example:
  {
    "name": "express",
    ...
    "scripts": {
      "test": "mocha --require test/support/env --reporter spec --bail --check-leaks test/ test/acceptance/",
      ...
   }
Then the tests can be run with npm test, no matter of the testing framework used.
Another thing you should consider for your projects is to enforce having all your tests pass before committing. Fortunately it is as simple as doing npm i pre-commit --save-dev.
You can also decide to enforce a certain code coverage level and deny commits that don't adhere to that level. The pre-commit module simply runs npm test automatically for you as a pre-commit hook.
In case you are not sure how to get started with writing tests you can either find tutorials online or browse popular Node projects on Github, such as the following:
8 Not using static analysis tools
Instead of spotting problems in production it's better to catch them right away in development by using static analysis tools.
Tools such as ESLint help solve a huge array of problems, such as:
- Possible errors, for example: disallow assignment in conditional expressions, disallow the use of
debugger. - Enforcing best practices, for example: disallow declaring the same variable more then once, disallow use of
arguments.callee. - Finding potential security issues, such as the use of
eval()or unsafe regular expressions. - Detecting possible performance problems.
- Enforcing a consistent style guide.
For a more complete set of rules checkout the ESLint rules documentation page. You should also read the configuration documents if you want to setup ESLint for your project.
In case you were wondering where you can find a sample configuration file for ESLint, the Esprima project has one.
There are other similar linting tools out there such as JSLint or JSHint.
In case you want to parse the AST (abstract source tree) and create a static analysis tool by yourself, consider Esprima or Acorn.
9 Zero monitoring or profiling
Not monitoring or profiling a Node applications leaves you in the dark. You are not aware of vital things such as event loop delay, CPU load, system load or memory usage.
There are proprietary services that care of these things for you, such as the ones from New Relic, StrongLoop or Concurix, AppDynamics.
You can also achieve that by yourself with open source modules such as look or by gluing different NPM modules. Whatever you choose make sure you are always aware of the status of your application at all times, unless you want to receive weird phone calls at night.
10 Debugging with console.log
When something goes bad it's easy to just insert console.log in some places and debug. After you figure out the problem you remove the console.log debugging leftovers and go on.
The problem is that the next developer (or even you) might come along and repeat the process. That's why module like debug exist. Instead of inserting and deleting console.log you can replace it with the debug function and just leave it there.
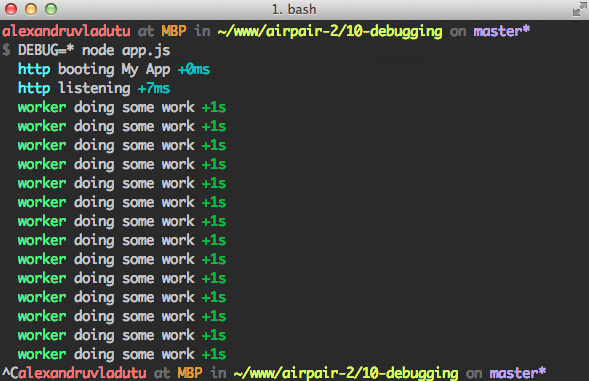
Once the next guy tries to figure out the problem they just start the application using the DEBUG environment variable.
This tiny module has its benefits:
- Unless you start the app using the DEBUG environment variable nothing is displayed to the console.
- You can selectively debug portions of your code (even with wildcards).
- The output is beautifully colored into your terminal.
Let's take a look at their official example:
  // app.js
  var debug = require('debug')('http')
    , http = require('http')
    , name = 'My App';

  // fake app

  debug('booting %s', name);

  http.createServer(function(req, res){
    debug(req.method + ' ' + req.url);
    res.end('hello\n');
  }).listen(3000, function(){
    debug('listening');
  });

  // fake worker of some kind

  require('./worker');

<!--code lang=javascript linenums=true-->

  // worker.js
  var debug = require('debug')('worker');

  setInterval(function(){
    debug('doing some work');
  }, 1000);
If we run the example with node app.js nothing happens, but if we include the DEBUG flag voila:
Besides your applications, you can also use it for tiny modules published to NPM. Unlike a more complex logger it only does the debugging job and it does it well.